I previously talked about how I expressed the TEV G>S cleavage site in bacterial cells. Not much happened last week, I was mostly focusing on working on my presentation. I scanned the SDS Page gel image I had that confirmed the TEV cleavage site was successfully expressed as protein. Then my mentor had to purify the protein because he said it was very complicated and needed everything to work well the first time. This week and next week I am running Bradford assays with the purified protein to determine the concentration of protein I have. The Bradford assay involves the use of Coomassie Brilliant Blue dye binding to specific protein of interest in order to determine the absorbance of that protein. Coomassie Brilliant Blue dye has three variant forms: red under acidic conditions, blue under basic conditions, and green under neutral conditions. When the dye binds to the protein of interest, it changes color from red to blue. The darker blue the dye is, the higher concentration of protein is bound to the dye. A spectrophotometer shines UV light through sample and detects the blue protein dye form at 595 nanometers of wavelength. Specific volumes of Coomassie Brilliant Blue dye will be added to known concentrations of the protein Bovine Serum Albumin and the absorbance of each variant solution will be detected with a spectrophotometer. A standard curve of absorbance vs. concentration will be generated with this to determine the unknown concentration of the protein I am testing.
Wednesday, April 20, 2016
Sunday, April 10, 2016
Week 7/8
Two weeks ago I attempted to express the cloned TEV cleavage site as a protein, however my results were not successful so I have been performing the same procedure last week and continuing on to this week as well. I previously discussed how I streaked a Carbenincillin plate and stored it for expression. I inoculated or isolated four colonies from this plate containing the TEV plasmid with the serine amino acid and grew it up overnight it 5 ml of bacterial culture tubes. I also isolated one colony from a previous glycerol stock containing the original TEV plasmid with the glycine amino acid and grew that up in 5 ml of bacterial culture overnight as well.
I then made SDS Page gels which I would use to later see whether my protein was actually expressed. (I was expressing the protein the next day, but making the gels in advance. The TEV plasmid would only be expressed as protein once induced with IPTG which I will talk about a bit later) SDS Page stands for sodium dodecyl sulfate polyacrylamide gel electrophoresis. This technique is used to separate proteins using two different buffer solutions. Sodium dodecyl sulfate is a detergent used to denature or unfold the protein from its tertiary state. This detergent also gives protein a negative charge giving proteins the desire to move towards the positive charge pole in the instrument also know as the cathode. Polyacrylamide forms the shape of the gel giving it its soft texture.
After growing up 5 ml cultures of the original TEV plasmid and the TEV plasmid with the changed amino acid, dispensed an aliquot of each bacterial culture and dispensed it in fresh 2 ml LB media and allowed the cultures to grow even longer. After an hour I checked the absorbance of each bacterial culture using a spectrophotometer. An absorbance reading between 0.3 and 0.4 means that the bacteria is now growing exponentially so its best to induce with IPTG at that specific time.
Once the bacterial cultures were growing exponentially, I dispensed an aliquot of each sample in SDS dye to denature the proteins. I labeled these sample tubes as uninduced samples because they were not induced with IPTG and therefore should not be expressed as protein. To the rest of the bacterial culture tubes, I added a calculated amount of IPTG. As I mentioned previously IPTG stands for Isopropyl β-D-1-thiogalactopyranoside and binds to the repressor which is bound to the promotor in lac operons. As IPTG binds to the repressor, the repressor changes shape and disassociates with the promotor allowing the gene to transcribe and translate to form protein. Expression for my specific protein takes about four hours. After inducing each bacterial culture with IPTG, I placed the culture samples in a shaking incubator at room temperature. After four hours I once again checked the absorbance of each sample and recorded the values. I then dispensed an aliquot of each culture sample in SDS dye and labeled these samples as the induced samples.
The next day I loaded equal and proportional amounts of both the induced and uninduced samples on the SDS Page gel. Once the proteins had been separated through the SDS Page gel, I stained the gel in Instant Blue dye so that I could visualize the bands of each protein sample. I then destained the gel in water because so that the dye would only remain on the protein bands and not the entire gel. After visualizing the gel on an imager, it was unclear to tell for sure whether the samples induced with IPTG actually expressed protein. It turns out that the IPTG solution I had used was a very old solution in the lab so last week I had to the same process all over again with a new IPTG solution. Last Friday I finished running the gel again and this Monday I will see if this time the protein expression was successful.
Friday, March 25, 2016
Week 6
Last week I finished cloning a plasmid construct containing the changed amino acid in the TEV cleavage site. To confirm whether the cloning was successful I picked four random colonies from the plate with the plasmid of interest and allowed them to grow overnight in lysogeny broth media. I then isolated specifically the plasmid DNA by performing mini preps for each plasmid and then used a nanodrop to obtain the concentration of plasmid DNA I had. I then took an aliquot of the purified DNA plasmid and diluted it with a specific primer (a sequence of DNA molecules that base pair with the DNA sequences in my plasmid, allowing DNA polymerase to extend the plasmid DNA sequence I have) I then submitted this mixture to a separate sequencing lab. What the sequencing lab basically did was amplify the DNA sequence I gave them in order to determine the exact sequence of the DNA I gave them. Basically how this works is through addition of dideoxynucleotides (nucleotides which lack oxygen or a free hydroxyl group) which have a fluorescent tag attached to them which allows us to visually see the DNA sequence through a computerized system. After the sequencing lab emailed back the DNA sequence I had, I was able to compare the amino acid sequence in the DNA samples I submitted with what the DNA sequence was supposed to look like. I had submitted four samples; two of the samples I submitted had the exact amino acid sequence as expected whereas the other two had errors. Because I was able to receive two successful clones of my plasmid, I could use one of them to express as a protein. I took an aliquot of the purified plasmid sample with positive cloning results and transformed that plasmid into two different bacterial strains and streaked these strains on two different plates. One bacterial strain containing my plasmid will be kept in storage in a -80 degrees Celsius temperature. The other bacterial strain containing my plasmid will be used to express my plasmid DNA as a protein. After expressing the DNA, I will purify the protein to ultimately run trials and see the efficiency at which the TEV protease cleaves off the TEV cleavage site with the change in amino acid.
Tuesday, March 22, 2016
Week 5- Cloning Complete!
In my previous post I talked about how I cut the plasmid vector backbone and my PCR product with the same restriction enzymes. Last week, I then run the plasmid vector on an agarose gel to separate my vector backbone which was approximately 7,000 base pairs in size from the piece I did not want which was approximately 78 base pairs in size. Because of the large size difference, it was very easy to see the position my vector backbone was at and I extracted out the vector backbone by actually cutting it out with a blade. I then used the Gel extraction/PCR cleanup protocol I briefly described in previous posts to purify the plasmid DNA from extraneous salts and whatnot. At the same time I also purified my digested PCR product. After this was completed, I ligated the PCR product with the change in amino acid to the plasmid vector backbone.
I then used electroporation to introduce the ligated DNA molecule containing the amino acid of interest into bacterial cells that can proliferate and make clones of my plasmid. Electroporators are basically that can generate an electric field in order to make bacterial cells permeable to the plasmid I am trying to insert into it. In this way I was able to transform bacteria so that it could take up the ligated DNA plasmid I had. I then heated the mixture containing the transformed bacterial cells and streaked these cells on a plate. I let colonies of bacterial cells to grow overnight in a 37 degrees incubator.
At the same time, I also used electroporation to introduce solely the plasmid vector backbone I had that did not contain my insert into bacterial cells. This was done to serve as a negative control. I streaked out these bacterial cells on a different plate to see whether for some reason I would see bacterial colonies grow. If they did, it would mean, I did something wrong and the plasmid ligated to itself instead of my insert. The plasmid was not supposed to ligate to itself because it was cut with two different restriction enzymes and making the ends of my plasmid incompatible to base pair with one another.
The following image shows the bacterial colonies I saw the next day.
 Each small white circular dot is a bacterial colony. The plate on the left had the plasmid vector without the insert whereas the plate on the left had the ligated plasmid and PCR insert. There was one bacterial colony on the left plate, and over 30 bacterial colonies on the right plate. My mentor had said that 30:1 is a pretty high efficiency so basically the cloning seems to be successful.
This week however, I am screening for colonies, meaning I am picking 4 random colonies from the plate on the right to confirm that these colonies actually have the insert I am studying with the amino acid change. I will discuss more about the screening process in the next post.
I then used electroporation to introduce the ligated DNA molecule containing the amino acid of interest into bacterial cells that can proliferate and make clones of my plasmid. Electroporators are basically that can generate an electric field in order to make bacterial cells permeable to the plasmid I am trying to insert into it. In this way I was able to transform bacteria so that it could take up the ligated DNA plasmid I had. I then heated the mixture containing the transformed bacterial cells and streaked these cells on a plate. I let colonies of bacterial cells to grow overnight in a 37 degrees incubator.
At the same time, I also used electroporation to introduce solely the plasmid vector backbone I had that did not contain my insert into bacterial cells. This was done to serve as a negative control. I streaked out these bacterial cells on a different plate to see whether for some reason I would see bacterial colonies grow. If they did, it would mean, I did something wrong and the plasmid ligated to itself instead of my insert. The plasmid was not supposed to ligate to itself because it was cut with two different restriction enzymes and making the ends of my plasmid incompatible to base pair with one another.
The following image shows the bacterial colonies I saw the next day.

This week however, I am screening for colonies, meaning I am picking 4 random colonies from the plate on the right to confirm that these colonies actually have the insert I am studying with the amino acid change. I will discuss more about the screening process in the next post.
Tuesday, March 15, 2016
Week 4
Previously I discussed how I am now changing an amino acid in the TEV cleavage site. (TEV stands for tobacco etch virus; it's the virus encoding this specific sequence) I am specifically changing the amino acid glycine to serine so that the TEV protease can cleave off the sequence more efficiently. In order to do this I had to amplify and isolate a plasmid containing the TEV cleavage site with the glycine amino acid; this would serve as the backbone of a recombinant molecule I am trying to create. I would then cut out the TEV cleavage site with the glycine amino acid and replace that with a similar sequence with the exception of the serine amino acid change.
Last week I first streaked a bacterial strain on a plate containing the plasmid backbone I needed for the cloning procedure. (This is the plasmid with the glycine amino acid in the TEV cleavage site)I allowed the bacterial colonies to grow overnight at 37 degrees Celsius. The next day I isolated a single colony and allowed it to grow up in LB media overnight. I then performed a mini prep (the technique I talked about in my previous posts) to isolate specifically my plasmid of interest.
At the same time I also performed PCR (Polymerase Chain Reaction; a technique used to amplify DNA) on the TEV cleavage site with the serine amino acid in place of the glycine. To confirm that the PCR worked, I ran the PCR samples on a gel to visualize the DNA bands. My PCR did work because in the gel image, the negative controls I had did not show while my samples did. I then performed a PCR cleanup to once again make sure I only have the DNA needed and not any other extraneous things. I obtained the concentration of my PCR samples with a nano drop.
After amplifying and isolating both the plasmid backbone and the PCR samples, I used the same restriction enzymes to digest or cut both the plasmid and the PCR samples. (restriction enzymes can be thought of as scissors used to cut DNA) By using the same restriction enzymes for the plasmid and PCR samples, I was able to create the same type of cuts which could ligate or bind to one another.
Today I ran the digested plasmid vector on a gel to separate basically the large backbone which I want from the small TEV site with a glycine amino acid which I don't want. I then cut out the gel piece with the plasmid and tomorrow I will be purifying it. After purification I can then ligate (or "glue together") digested purified PCR product and digested purified backbone.
Monday, February 29, 2016
Week 3
Last week the supervisor of my lab actually decided for me to work on a different project that still connects with the previous project I was working on. Previously I was supposed to express and eventually purify the telomerase RNA binding domain(TRBD). In order to purify any protein, the protein has to have a specific tag that would help select for that only that protein. In this case, the TRBD protein was tagged with a maltose binding protein. However after purification, the maltose binding protein must be separated from the TRBD protein. In order to do this a specific protease is used. In this case a TEV protease encoded by a tobacco etch virus cleaves at specific site to separate the maltose binding protein from TRBD. This digestion process usually takes about a day. This image I got from https://www.neb.com/applications/protein-expression-and-purification/coupled-protein-expression-and-purification/maltose-binding-protein-expression may better describe what I am talking about.
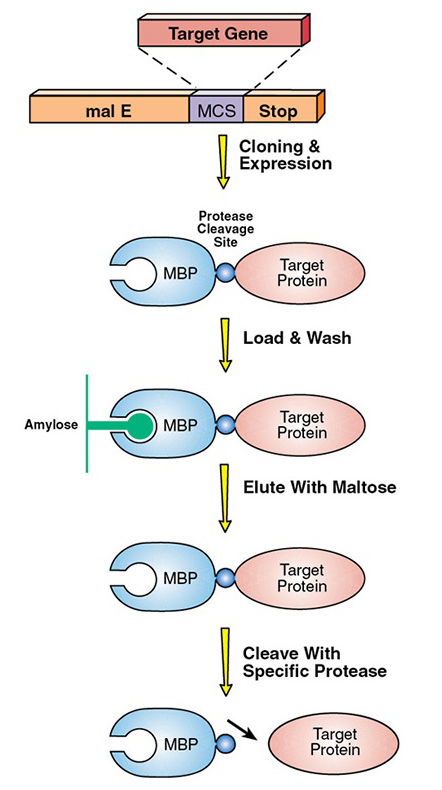
The TEV protease binds to and cleaves off a specific amino acid sequence located between TRBD and the maltose binding protein. The supervisor in my lab recently read about a single amino acid change in this sequence may allow the TEV protease to cleave off the sequence faster. This would be more efficient for purifying the TRBD protein because the digestion process may happen in less than two hours vs. an entire day. My project right now is to show how efficient the single amino acid change in the TEV cleavage sequence would be for purifying TRBD because the lab has never tested it before.
Because of this sudden project change the only hands on thing I actually did was make a buffer for dispensing the pellets containing TRBD as part of the purification for TRBD. The rest of the time I attended lab meetings where each person talked about their progress with their projects and when the supervisor tried to explain this project to me.
This week I will be starting the new project and in the next post I will talk more about it in detail. Like some other people, I may also have to change the title of my presentation.
Monday, February 22, 2016
Week 2
Last week I expressed the Telomerase RNA binding domain (TRBD) of sea urchin in bacterial cells.
By expression, I mean this gene has not yet transcribed and translated to become protein. In order for the TRBD gene to transcribe, the reagent (IPTG) must be present. IPTG functions similar to allolactose. It binds to the lac repressor on the operator (sequence in promotor) in bacteria in an allosteric manner (meaning IPTG binds to the lac repressor in a spot other than the active site) Through this binding, IPTG is able to change the shape of the repressor, disabling the lac repressor from binding to a sequence in the promotor. Once this happens, RNA polymerase is able to bind to the promotor and transcribe the TRBD gene into mRNA which can then translate into protein.
Previously my mentor had transformed E.coli bacterial cells with a plasmid containing the TRBD gene. In other words, there was already a stock solution of bacterial cells which contained a plasmid containing the TRBD gene. I had to isolate a colony of bacterial cells and eventually grow them up in a 1L culture before inducing protein expression with IPTG.
The first day I streaked the stock solution of bacterial cells onto a carbenicillin plate. Carbenicillin is an antibiotic used as a means of selecting only bacterial colonies resistant to this antibiotic. The cells were then incubated and allowed to proliferate overnight at 37 degrees celsius.
The next day I saw colonies of bacteria on the plate and isolated a single colony of bacteria through what is known as a starter culture. To do this first pipetted 10 microliters of a stock of carbenicillin in a glass culture tube. Once again I only wanted to grow up bacteria resistant to this antibiotic. I then added 10 ml of lysogeny broth to each of my culture tubes. Lysogeny broth is a liquid media rich with nutrients allowing bacteria to proliferate quickly. I then flamed forceps and picked a colony of bacteria with a sterile toothpick and placed that in the culture tube. I then allowed bacteria to grow in a shaking incubator at 37 degrees celsius overnight.
The same day I prepared one liter of the mixture of lysogeny broth for preparation to grow bacteria from the 10 ml culture to the 1L culture the next day. The reason why I first had to grow up bacteria in a 10 ml culture is because if something went wrong with the bacterial growth initially, it only ruined 10 ml of culture not a whole liter. You can tell that there was something wrong with the bacterial growth in 10 ml because the solution starts to turn more clear. In order to prepare the 1L culture, I mixed 25g of lysogeny broth mix with 1L of water. I then had to take this mixture to an autoclave machine which is a large pressure chamber that would sterilize the lysogeny broth media in 20 minutes.
The next morning, I added one ml of carbenicillin to the larger 1L culture along with 10 ml of 20% glucose. I then removed the initial 10 ml starter cultures from the shaking incubator and added it to the 1L media. After mixing the 1L media, I pipetted an aliquot of this media into a cuvette which I put in a spectrophotometer to obtain the initial optical density of the cell culture which is proportional to the cell density. I then placed this 1L media in a shaking incubator at 37 degrees celsius and periodically recorded the optical density till the bacterial culture solution reached a desired optical density. This desired optical density is usually approximately double the amount of the initial value.
After incubation, I could finally begin the protein expression. I added .05g of IPTG to the 1L bacterial culture solution and then placed the bacterial culture solution in a 25 degrees celsius shaking incubator. Protein expression was then carried out for four hours.
In the meantime, my mentor had me extract DNA from 10 PCR samples and then extract DNA from agarose gel samples. This was not specific to my project, it was done for practicing DNA extraction. I basically added various wash buffers and lysis buffers to the DNA solutions and finally measured the concentration of the DNA in each sample. The process was very similar to the mini prep from last week, however the term miniprep is used to talk about isolating specifically plasmid DNA in preparation for further usage of the plasmid.
After four hours, protein should have been expressed in the bacterial cultures. I then poured the 1L media into two 500 ml culture tubes which I had to centrifuge. Centrifugation would allow the bacterial cells with protein to settle at the bottom of the 500 ml tubes which would be called the pellet. Because the volume is so large, I used an ultracentrifuge which is capable of generating very high acceleration speeds; I centrifuged the cells at 5000 RCF (Relative Centrifugal Force measured by force generated multiplied by gravity) After centrifugation, I removed the media sitting on top and froze the pellets in -80 degrees celsius.
This week I will be purifying the protein in the pellets.
Subscribe to:
Posts (Atom)